https://youtu.be/WzHJeHB7me4
Tuesday, April 11, 2017
Creative Critical Reflection
Here is my creative critical reflection in which I talk about the entire process of the making of my magazine. Enjoy!
https://youtu.be/WzHJeHB7me4
https://youtu.be/WzHJeHB7me4
Monday, April 10, 2017
Final Project
I've finally finished my magazine! After all of the research and planning that went into it, I am proud of the product that I have created. Finally all those hours of working on it have paid off. Here is the link to my magazine:
I had a lot of fun making it and I hope you enjoy it as much as I do!
Sunday, April 9, 2017
Double - Page Spread Graphic
For my double - page spread, I decided to to do a chart - like graphic consisting of multiple images rather than just one, large image. Since the topic of my story is color psychology, I thought it would be a good idea to make a chart of what words are associated with each color, with pictures of a prom dress in each color alongside that. Essentially, the graphic is a quick summary of what is discussed throughout the article.
Making this seemingly uncomplicated graphic took much longer than expected. This is due to the fact that I had to edit six different pictures of prom dresses (cut out all of the background in each picture). I titled it "Color Psychology" and made each letter a different color to make it more noticeable.
Pictured below is the completed graphic. I plan on putting this graphic in the upper right hand corner of the second page of my double page spread. It will obviously be smaller than how it looks in this picture; I only made it bigger here so I had more space to work on putting it together.

Saturday, April 8, 2017
Cover Page Completed!
The one thing that was keeping me from finishing my cover page a long time ago was the fact that I didn't have a cover image. This was starting to stress me out, since it is probably the most important part of my entire magazine. So on Friday, I finally went out and took it. It didn't take nearly as long as I had thought it would, surprisingly. I guess I had picked the right day to take the picture, because the lighting outside didn't give me any problems. Below is the picture I have chosen to be my cover image:

I initially started to cutout the background, but I started to think that maybe the cover page would look more interesting if I included the entire background. I decided that it did look much better, and decided to keep it exactly the same. The light spot at the top of the page would serve as a good place to put the masthead, which is another positive of keeping the background.
Once I figured out the cover image, laying out the cover lines was easy. I already thought of all the titles and fonts, so all that was left to do was to arrange them in such a way that they all "surrounded" the girl.
One small challenge that I faced was finding a font color that was a strong enough contrast with the background. Since the background is mostly a dark green, I needed to pick a light color in order for the text to show up well enough. After trying out tons of colors, from different shades of blue, white, yellow, and pink, I finally decided on making the cover lines white. They stood out the most and looked better than all of the other ones that I had tried. I made the text below the cover lines a teal color. I chose teal because it contrasted to the white cover lines but was still visible to read despite the background. Below is what the final cover page looks like:

I'm really pleased with how it turned out, and I hope you are too!
Thursday, April 6, 2017
Pictures, Pictures, and More Pictures
As I approached the completion of the magazine, I realized a little late that my magazine was lacking in the amount of images in it. As I was creating the table of contents, I noticed that there were a lot of blank spots that looked weird. To fix this, a simple solution would be to add images that were representative of some of the articles featured in the table of contents.
One of these articles, titled "Spring Styles 2017", has a broad topic and therefore it would not be difficult to take a picture for. I asked one of my friends to wear a spring - like dress and model for the picture. At the end of the photoshoot I had taken over 200 pictures in total. This is because I was trying to capture an image with the perfect pose, background, and lighting. Although this image will only consist of a small portion of the table of contents, I still wanted it to be as good and high quality as possible. Shown below is the final image that I chose.

I added other pictures to my table of contents as well. I have one article titled "Good Reads", so taking a picture for this would not be challenging either - I would simply take a picture of a pile of books. Although not complex or entirely unique, I think this picture will add to the aesthetic of the page.
I am currently working on editing all of the pictures I have taken over the past couple of days, so I will not post them here yet.
Hopefully adding these pictures in will make my table of contents look more visually pleasing than before and will help to get rid of all the blank space. We will see how it turns out!
Saturday, April 1, 2017
Some Changes
As you may recall from a few blog posts ago, I decided that I wanted my double-page spread story to be about prom. I planned on creating a guide for finding the perfect dress based on different colors, designs, and lengths. I began writing the portion of my story that focused on color first. When I finished that section (which I wrote on Google Docs), I copy and pasted it on Canva to begin formatting the pages. I was so surprised when I saw that it took up the majority of the two pages! I was still planning on talking about dress designs and lengths within those two pages. I was then stuck in a dilemma: Do I shorten the section on color significantly to be able to fit the design and length sections in there too, or do I change the focus of my story to just one of these three topics?
I really liked the idea of talking about color psychology and how certain hues give off certain feeling and emotions when looking at them (I got this idea from one of our group meetings). I thought that this idea was unique and not just an everyday topic that you come across. For this reason, I decided to keep the section on color. I had put a ton of planning and research into my writing, so I didn't want to shorten it and therefore reduce the quality of the overall story. So, I decided to slightly change the topic of my double-page spread and put all of the focus on color.
Making my story focus on one topic rather than three is a change for the better, I think. This way, the story will be more fluid and continuous instead of being broken apart by a bunch of sections. This will make it less confusing and more in-depth and interesting.
Because of this change, I have also come up with a possible idea for how I want to lay out the images on the page. On the top of the second page, I want to make a visual representation of what i'm talking about through the article; summarizing it. I have plenty of pictures of different colored prom dresses as well, so this could work out. I plan on using pictures of prom dresses that are the same colors as the ones that I mention throughout the article. Under them, I want to add a few adjectives that are associated with each color. This serves as a quick and visually interesting synopsis of the article, for those that may not want to read the entire story associated with it.
Thursday, March 30, 2017
Table of Contents Updates
I began to lay out my table of contents about a week ago, but I haven't posted much about my progress. So in this blog post, I would like to talk about that. The first thing I knew that I wanted to include in my table of contents was a section titled "always included" or "in every issue". I learned from class that this is characteristic of many successful magazine brands, especially those that are in the fashion and style genre. Since my magazine is this genre, I knew that it was necessary that I include this.
I thought of about five different topics to put in this section. Coming up with these was actually somewhat challenging, because I had to make sure that they were all broad enough topics that could be present in every issue of an ongoing magazine. The ones that I came up with are: "Who wore it better?", "Q&A with the staff", "Homemade outfits", "What's trending", and "Share your story". After coming up with these names, I began figuring out where I wanted this section to go on my table of contents pages. I think I like it on the right hand side of the second page. That way it's not taking up the first page where all of the new and fresh stories will be located. Here is what the section looks like:

I thought of about five different topics to put in this section. Coming up with these was actually somewhat challenging, because I had to make sure that they were all broad enough topics that could be present in every issue of an ongoing magazine. The ones that I came up with are: "Who wore it better?", "Q&A with the staff", "Homemade outfits", "What's trending", and "Share your story". After coming up with these names, I began figuring out where I wanted this section to go on my table of contents pages. I think I like it on the right hand side of the second page. That way it's not taking up the first page where all of the new and fresh stories will be located. Here is what the section looks like:

I'm not sure if the text is going to be surrounded by that green circle in the final edit; I think that I can come up with a design more exciting than that.
I've also decided that I am going to group my articles together using different subheadings. I've come up with a few, including "Tips & Tricks" and "Celebrities". The majority of the articles will fit into one of those two topics. If necessary, I will add another subheading for a few articles that do not go under the two subheadings previously listed.
As i've mentioned before, I will be adding short descriptions of each article under their respective titles on the table of contents. I've done this for all of the articles listed under "Tips & Tricks" already. I don't think adding these descriptions is necessary for the "In Every Issue" section, as the content of these articles varies with every issue, and they are self-explanatory anyway.
Wednesday, March 29, 2017
Working On The Double Page Spread
Since deciding that my double page spread is going to be about what to wear to prom, I've been doing some research to get more educated on the subject. I plan on discussing various aspects of prom dresses, including different lengths, designs, and colors. On the topic of color, I decided to do some research on color psychology to get a better understand of what each color signifies. This is a subject that we discussed in class, so I already had some prior knowledge about it. I got the majority of my additional research from this website. The website explains what traits are associated with each color. I plan on using this information as part of my guide on what dress to wear depending on someone’s individual characteristics.
I’ve also taken some pictures of different prom dresses to go along with the article. Obtaining these pictures was surprisingly not a difficult process. Some of my friends had been planning to go prom dress shopping for a while, so I simply saw the opportunity to get pictures for my magazine and went with them. I made sure to take pictures of a variety of different colored dresses, because I want to use them in the section where I talk about color psychology.
The next step was to add these images into my magazine. Before I could do that, however, I had to edit them. I have never used a photoshop program before, so I looked online for a simple tool that would help me to crop my pictures, fix the coloring, etc. I found this website, which had all of the features I needed to edit my pictures and was extremely easy to use. Let me give you an example of an image that I edited using this website:
 |
| After |
 |
| Before |
I also did a bit of color-correcting to make the dress appear more green. This si because when I took the picture it didn't capture the color very well; it turned out more blue than green.
I repeated the process above for all of the pictures of the prom dresses. I now have to incorporate these images into my layout; i'll let you know when I do!
Citations
Citations
Sunday, March 26, 2017
Clothing Choices
Since the primary focus of my magazine is going to be fashion, the majority of the images in it will consist of people and clothing. A few of my friends have already agreed to model for my images, so that is taken care of. The next task at hand was to figure out the type of clothing that I wanted them to wear.
I had already decided that the main topic for my magazine issue would revolve around spring, so I decided that the majority of the clothing would consist of spring colors and styles. The website Modcloth helped me develop a better understanding of what types of clothing constituted being associated with spring. As I browsed through their collection of spring apparel, I found some characteristics that most of them had in common. The first was that almost all of them were in some vibrant color. The colors that I found to be most common were pink, blue, black, and green. I also found that most of the clothing items in this category were dresses.
Using this knowledge, I asked my friends to accumulate any clothing they have that meet these characteristics. These are some of the items that they found:


I plan on using all of these throughout my magazine, specifically on my cover page.
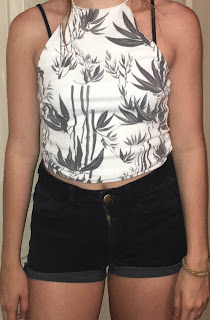
I also have some non-dress clothing items such as shirts that I will use in my magazine (pictured below).


I will keep you updated on which clothing items will definitely appear in my magazine, as well as the final edited pictures of the models wearing the clothes.
Citations
Saturday, March 25, 2017
Making Progress (Cover Page)
Once I had finished played around with the website a bit, I started to layout the cover page. I'm pleased with how it looks so far, however I am not completely sure if all of what I have laid out is here to stay. One aspect that is pending is the masthead. I was having trouble coming up with the brand name, so I just put Trendy to be my placeholder for now. It might stay, it might not. Before I delve too deeply into analyzing my work so far, let me show you what I have done so far:


You probably noticed that a big part of the cover page is missing - the main cover image. I'm working on it. I have plans to go and take pictures for my magazine tomorrow, so hopefully that will work out. But for now, I have a good idea of how the rest of the cover page will look. As you can see, my main color scheme is black/gray. I chose to make the main cover line a different color than the other cover lines because the focus of this issue will be spring, and the color green accentuates that. One thing that I am sure will stay is the font of the masthead. I think it is perfect for the type of magazine that I am trying to create. It's not too formal- instead it brings upon a sense of creativity and individuality. I've also added some essential elements that a cover page should have; such as a dateline, price, and barcode in the bottom left corner. I've incorporated both numbers and lists into my cover lines to add appeal. I've also added a selling line located right above the masthead. This is subject to change as well, but for now I like it- it is short and to the point.
I am constantly doing subtle changes to the cover page such as spacing and font size, trying to ensure that it looks as organized and professional as possible.
Images
Layout Software (Canva)
I have finally found the perfect program to use for laying out the pages of my magazine: Canva. Unlike other programs that I have tested such as Scribus, Canva allows you to do all your work through their website without needing to download an application. When I first began using it, I found it to be beginner friendly, having a format that was extremely simple to navigate (shown below).


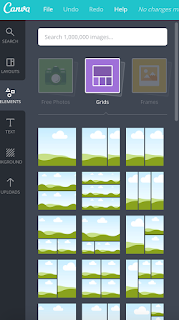

It has many great features embedded in the website that will definitely help me when deigning my magazine. Some of these include grid lines, frames, and unique fonts. It also has hundreds of different layouts to look through and edit, which have helped me immensely in finding similar examples of what I would like to achieve through my cover page. Pictured below are some of the features that I have mentioned above.


I wanted to introduce the website and all its features before beginning to post my progress because they will play an integral role in the entire production process going forward.
Citations
Images
Sunday, March 19, 2017
Double - Page Spread Layout
After doing research on double page spreads last week, I began working on creating my own. You can view my previous post on double-page spreads here. There, I talked about the different elements that I do and do not want to be part of my design. I explained how I don't want it to be overly simplistic and boring; rather I want it to have many interesting components to it. Here is what I came up with:


I plan on adding many more elements to it once I become familiar with the design software that I will be using, but for right now this is a good place to start. I definitely want to include some of the quotation bubbles I drew here in the final product. I think they are more unique than simply adding a pull-out quote beside the text.
Citations
Table of Contents Layout
Before showing you the rough draft of my table of contents, I would like to discuss the research that I did to help me with some of my ideas. Once again, most of the inspiration I got was from Pinterest. This is the site that I've found has the biggest assortment of creative and innovative ideas and projects. After browsing through many posts, I found a few that I like (shown below).

I like how this table of contents is simple yet appealing. The flowers on the left give a variety of color to the page, but not too much to be overwhelming. I also like how there is a short summary of each article below each respective title. This is something that I would like to incorporate into my magazine.

I like how this table of contents has a picture to go with almost every article featured in the magazine. The picture adds visual interest as well as easy access to find the article that the picture is associated with by printing the page number next to it. This table of contents also has a short summary of each article below the titles.
I imagine my table of contents to have more resemblance to the second image. I want it to be simple but interesting, with an assortment of colors throughout. Using this second image as my main source of inspiration, I sketched a picture of what I imagine my table of contents to look like:

In addition to having pictures for each article and a small description, I've added a small box on the right hand side titled "In Every Issue". This is pretty self-explanatory; there will be five or so topics that will be featured in every issue of the magazine. I'm not yet sure what these topics will consist of, but I will figure that out later and update you on it.
Citations
Images
Saturday, March 18, 2017
Coverlines and Layout Planning
On Wednesday I began brainstorming ideas for cover lines that will be featured on my magazine. From what I learned in class, consumers love seeing numbers and lists in cover lines. This is probably due to the fact that they look more simplistic and attractive than cover lines that are longer and more wordy. Knowing this, I plan on incorporating these tactics into my own cover lines.
I began looking online and through magazines I found at home to get some inspiration. I found this website to be helpful in giving me some ideas. All of the magazine cover pages listed on this website have a least one cover line with a number in it, further implicating that they are preferred by consumers. Below are some of the magazine covers featured on the website.

After doing research, I did a rough sketch of what the cover page of my magazine would look like. I have incorporated numbers as well as lists into the cover lines. I still have not decided what my magazine will be called, so I wrote "masthead" in place of the actual title for now. However, there are some characteristics of the cover page that I am almost certain will end up on the final product. Firstly, I want the masthead to be located across the top of the page. The font is going to be slightly slanted and wavy, all in capital letters. The main cover line will be right next to the main cover image, taking up the majority of the page. Additional cover lines will be located at the very bottom of the page in varying colors and font sizes. Below is the sketch I made of my cover page.

Citations/ Images
Nikola. "55 Best Tips for a Successful Magazine Cover." Magazine Designing. N.p., 19 Apr. 2015. Web. 15 Mar. 2017.
I began looking online and through magazines I found at home to get some inspiration. I found this website to be helpful in giving me some ideas. All of the magazine cover pages listed on this website have a least one cover line with a number in it, further implicating that they are preferred by consumers. Below are some of the magazine covers featured on the website.


After doing research, I did a rough sketch of what the cover page of my magazine would look like. I have incorporated numbers as well as lists into the cover lines. I still have not decided what my magazine will be called, so I wrote "masthead" in place of the actual title for now. However, there are some characteristics of the cover page that I am almost certain will end up on the final product. Firstly, I want the masthead to be located across the top of the page. The font is going to be slightly slanted and wavy, all in capital letters. The main cover line will be right next to the main cover image, taking up the majority of the page. Additional cover lines will be located at the very bottom of the page in varying colors and font sizes. Below is the sketch I made of my cover page.

Obviously everything I have drawn is still prone to change. Once I actually begin laying out my pages on the computer, I may come up with a design that is more visually engaging and interesting. I will let you know of any changes that occur once I begin the process of laying out everything next week. Until then, I must still come up with a rough draft of my table of contents and double page spread. These will be the topics that my next few posts will consist of.
Citations/ Images
Nikola. "55 Best Tips for a Successful Magazine Cover." Magazine Designing. N.p., 19 Apr. 2015. Web. 15 Mar. 2017.
Schedules
I apologize for the lack of blog posts recently. This week I have been extremely busy with school, and have therefore not been able to work on this project as much as I would have liked to.
To help improve my time management, I created a schedule for myself. I set a goal for what I would like to accomplish each day all the way up until the due date, April 9th. This way, I will know how much time I should be dedicating to each task regarding this project in order to complete it on time and without rushing. Below is a picture of the schedule I made. Hopefully I will be able to stick to this schedule and not fall behind too much.

Speaking of schedules, I have also made arrangements with my friends who will be featured in my magazine for shooting times. If all goes according to plan, the photoshoot will happen next week between Friday and Sunday That way, I will have everything I need to complete the layout of my magazine by Monday, leaving me over a week to incorporate my images into my chosen layout design.
Sunday, March 12, 2017
Double-Page Spread Inspiration
During this posting I would like to discuss the double page spread. Having no clue how or what I want my double page spread to look like, I took to the internet to hopefully find some inspiration. The website that I found to be most helpful to me was Pinterest, therefore that is where the majority of the layouts discussed here will originate from. If there is one thing that I do know about how I want my double page spread to look, it's that I want it to be colorful and have a lot of...things going on. I don't know how exactly to explain it. Essentially, I don't want it to be overwhelmingly plain and simplistic. Let me give you an example of what I mean.
What I DON'T want my double page spread to look like:


What I DON'T want my double page spread to look like:


While I can appreciate the minimalist and uncomplicated design of these spreads, this is not what I had in mind for my magazine. I want something that is more visually engaging and interesting to look at; something that will be sure to capture the reader's eye. Having one page full of text and the other completely filled with an image is too uniform and basic-looking for what i'm trying to achieve.
Below are some double page spreads that I came across on Pinterest that I found to be especially intriguing and inspiring.
Creative layouts that I DO want my double page spread to have qualities of:

What I really like about this particular spread is how the majority of the graphics appear to be hand-drawn and not computerized. This helps to give a stronger sense of intimacy between the magazine and the reader. I also like how this layout does not appear to be meticulously organized, but rather the the graphics seem to flow from one page to the next. Another characteristic about this layout that I like is the font of the article title. It too does not appear to look perfect, having random lines sticking out to make it look a bit messy. In conjunction with the imperfect graphics, the design of the letters adds to the "homemade" feel of this page, which is what I find unique and interesting about it.

What made this double page spread catch my eye was the vivid colors, variety of graphics, and the numbers. There appears to be a lot going on, which makes readers more inclined to stop and read the page. The sharp contrast between the pink and white toothbrush and the bright blue toothpaste on top of it is undeniably noticeable. I like how the text is divided into chunks by the graphics rather than it being consistent and appearing longer. This makes me feel less intimidated to read the page in a sense, because it looks like a few short paragraphs rather than one lengthy article. All of these elements together make for a visually pleasing page filled with pictures and numbers, all of which are quick to grab a readers' attention.

Out of all of the layouts that i've seen throughout my research, I think that this is the one that stood out the most to me. I love the background of the page and how it fits in well with the rectangular design. This design, although simple, adds a great deal of diversity to the page and sets itself apart from the others. Putting an image behind my article title or adding an interesting design like this one is definitely something that I will consider when I begin designing my own double page spread.
Images
Togatala, Junior. "Double Page Spread 2015 Design." Pinterest. N.p., 19 May 2015. Web. 11 Mar. 2017.
Characters and Plot Research
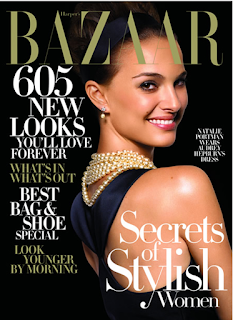
After much reflection upon my previous posting, I have decided to go along the route of making a fashion/style magazine. However, there are still some factors to consider before I begin the process of planning the contents of the magazine. First off, I have to figure out who my target audience is going to be. In other words; the gender, age group, and socioeconomic status of my readers. Most of the fashion/style magazines that I have come across through my research and personal experience have been directed toward an audience of women between about 25 to 45 years of age. Examples of magazines with this specific target audience would be Cosmopolitan , InStyle , and W. It is clear from the cover pages of these magazines that they focus heavily on celebrities to help their fashion and style tips gain credibility. It is not enough to say that something is fashionable, rather these magazines need to show proof to their audience that a certain way of dressing is popular at the moment. One difference between fashion magazines for younger and older age groups is the types of celebrities that they include in their issues. The magazines directed toward an older audience will tend to use older celebrities that the readers are more likely to relate to, whereas magazines for a younger audience will use more youthful celebrities for the same reason. The types of cover lines that each magazine features also vary. This difference is seen clearly through the covers of Vogue and Teen Vogue (pictured below).


Many features of the cover page are altered between these two magazines in order for it to be appealing to their respective target audiences. The first obvious change that I noticed was the font and color scheme. On the left, Vogue's cover lines are all in a thin font consisting of very defined edges and are either in red, white, or black. All of these characteristics add a feeling of sophistication and elegance to the look of the magazine. On the other hand, the font on the cover of Teen Vogue's magazine is larger and more curved. The color of the lettering is also more childish, using bright pinks and purples. All of these aspects make Teen Vogue seem more youthful and innocent, making it more visually appealing to a younger audience.


Many features of the cover page are altered between these two magazines in order for it to be appealing to their respective target audiences. The first obvious change that I noticed was the font and color scheme. On the left, Vogue's cover lines are all in a thin font consisting of very defined edges and are either in red, white, or black. All of these characteristics add a feeling of sophistication and elegance to the look of the magazine. On the other hand, the font on the cover of Teen Vogue's magazine is larger and more curved. The color of the lettering is also more childish, using bright pinks and purples. All of these aspects make Teen Vogue seem more youthful and innocent, making it more visually appealing to a younger audience.
Not only is the physical appearance of the cover lines of the two magazines different, but so is the content and the wording. On the right, Teen Vogue utilizes language that they think younger people would typically use, such as "cool" and "crushing hard". Vogue's cover lines, on the other hand, are less flowery and more straightforward. Teen Vogue is mostly concerned with fashion, gossip, and relationships; whereas Vogue has a lager focus on political issues and other topics that typically interest adults more.
I found a great example of a topic that a magazine with an older audience would have on Cosmopolitan's online magazine titled "Grown Woman's Guide to Life". This is a section that is included and updated in each issue of their magazine. It includes tips on saving money and career choices. Likewise, I have found specific topics present in fashion magazines directed toward a younger audience that are not included in magazines for an older audience. An example would be in Seventeen, where they have a portion of their magazine dedicated to anything to do with prom. This includes advice on what dresses to wear and where to buy them.
 |
| Cosmopolitan's "Grown Woman's Guide to Life". |
 |
| An issue of Seventeen magazine dedicated to prom. |
Taking all of this knowledge I have gathered into account, I have decided that my magazine will be directed toward a younger audience of middle-class females between the ages of 13 and 20. Given that I am of that age range, I have a better understanding of what is of interest to others of that age and therefore am more confident in my ability to produce a successful magazine that meets the needs of that target audience.
I have already begun to ask some of my friends to be either on the cover page or somewhere else within my magazine, and so far they have all agreed. Now that I have an idea of what my magazine will consist of, I definitely feel less anxious and more excited to begin working on it.
Citations
Images
Saturday, March 11, 2017
The Beginning (Genre Research)
In beginning this extensive and exciting process
of producing an original magazine complete with a cover page, table of contents
and double-page spread, I instantly felt overwhelmed and anxious. I began
thinking about everything that I would have to do; take photos, layout and
design the magazine, figure out what to write about, etc. I eventually realized
that before I could actually begin doing any of these tasks, I had to
first determine what my magazine was going to be about. This meant doing
extensive research on different magazine genres.
This was the first
website that I came across when I began researching. It features a ton of
different magazine categories and sub-topics within those categories to
explore. Having no idea what I wanted my magazine to be about, I
clicked on every single category in the hopes of discovering something that
caught my eye. Upon clicking on one of the categories, it brings you to a page
filled with magazines that fit into that specific categorization. I found this
to be especially helpful because it provided me with an abundance of magazine
publications that specialize in a particular area for me to further
explore. Below is an example of various art magazines that the website offers
access to.

As I began browsing through the dozens of categories, a few got my attention. The first was the genre of science magazines. This is probably due to the fact that I have always loved science and math, so this was a magazine that I would probably want to purchase. However, as I pondered the idea of this being my chosen genre, I began to grow skeptical of how it would turn out. The major problem I foresaw with this genre was the cover image. The majority of cover photos of science magazines consist of some amazing, ground-breaking image or discovery. Some great examples I found of this were in this issue of Discover magazine and this National Geographic one. This is the focus of the magazine issue; what makes people want to read it. Given the fact that the cover image of my magazine has to be original, and that I have not and probably will not be in the presence of some great scientific breakthrough, I found it doubtful that I would be able to capture an image intriguing enough to be the central image of my cover page. Painfully realizing this, I moved on.


I am not personally a huge fan of these types of
magazines, so I decided to do more research on them. I found a helpful website that
lists some tips on designing a fashion magazine. It includes
information on how to make interesting headlines and overall cover design. One
quote from this article that I found to be especially significant was:
"The cover of the fashion magazine is one of the most important parts and you have to design it to be attractive, because it is the first contact the reader will have with your magazine."
I cannot say for certain yet that this is
going to be my genre of choice for this project, but it is looking that way
right now. I will let you know in my next few blog posts what my definite genre
is and what content I plan on including in my magazine!
"The cover of the fashion magazine is one of the most important parts and you have to design it to be attractive, because it is the first contact the reader will have with your magazine."
Reading this caused me to become even more
motivated in achieving my goal of creating a cover that is visually
engaging and attractive.
Using this website and information I gathered by
looking at a lot of different fashion magazine brands, these are some constant
themes that I have gathered:
- The cover usually consists of one image that
takes up the majority of the page.
- Most magazines have a recurring color scheme
present on the cover page and throughout the entirety of the magazine. For
example, Vogue's color scheme for their cover lines is black and white.
- The masthead is usually centered on the very top
of the cover page and is in a colored font that makes it stand out and
noticeable.
- Most magazines have occasional special issues
that are dedicated to a specific topic.
-- The cover image is usually a close-up shot of a
well- known celebrity
b
Citations
Images
Subscribe to:
Posts (Atom)